
If you are interested in exploring the world of blockchain and cryptocurrencies, setting up Tron Link is a crucial step to take. Tron Link is a secure and user-friendly wallet that allows you to interact with the Tron blockchain. Whether you want to make transactions, store TRX tokens, or participate in decentralized applications (dApps), Tron Link is an essential tool to have.
To set up Tron Link, follow these step-by-step instructions:
Step 1: Install Tron Link Extension
Start by opening your preferred web browser and searching for the Tron Link extension in the browser’s extension store. Once you find it, click on the “Add to Chrome” button to install the extension.
Step 2: Create a New Wallet
After installing Tron Link, click on the extension’s icon in your browser’s toolbar. A pop-up will appear, giving you the option to either create a new wallet or import an existing one. Since we are setting up Tron Link for the first time, select “Create Wallet.”
Step 3: Set Up a Strong Password
To ensure the security of your wallet, it is important to set up a strong password. The password should be at least 8 characters long and include a combination of uppercase and lowercase letters, numbers, and special characters. Enter your chosen password and click “Next.”
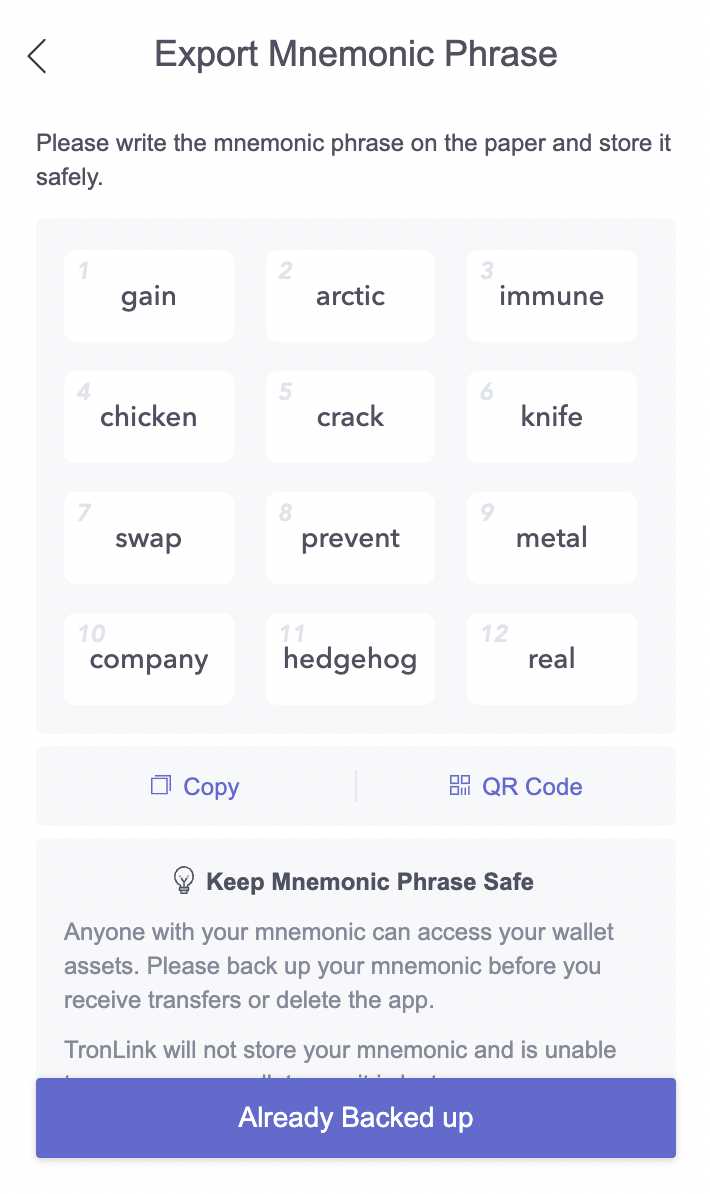
Step 4: Back Up Your Wallet
Tron Link will then provide you with a 12-word recovery phrase. This phrase is crucial for restoring access to your wallet in case you forget your password or lose your computer. Write down the recovery phrase on a piece of paper and store it in a safe place. Click “Next” once you have securely saved the recovery phrase.
Step 5: Confirm Your Recovery Phrase
To ensure that you have correctly written down your recovery phrase, Tron Link will ask you to select the words in the correct order. This step is essential for verifying the accuracy of your backup. Select the words in the correct order and click “Next.”
Step 6: Unlock Your Wallet
After confirming your recovery phrase, Tron Link will prompt you to unlock your wallet. Enter your password and click “Unlock” to gain access to your wallet.
Congratulations! You have successfully set up Tron Link on your computer. Now you can begin exploring the world of Tron and all that it has to offer. Remember to keep your recovery phrase safe and never share it with anyone.
Note: Make sure to select a strong password to protect your wallet from unauthorized access. Additionally, consider enabling additional security measures, such as two-factor authentication (2FA), for added protection.
What is Tron Link and how to install it?

Tron Link is a digital wallet that allows users to securely store, manage, and interact with TRON (TRX) and other TRON-based tokens. It is a browser extension that adds TRON’s functionality to your browser, making it easy to access and interact with decentralized applications (DApps) on the TRON blockchain.
To install Tron Link, follow these steps:
- Open your preferred web browser.
- Go to the Tron Link website.
- Click on the “Download” or “Install” button.
- Choose the appropriate version for your browser (e.g., Chrome, Firefox).
- Click on the “Add to Chrome” or “Add to Firefox” button.
- A pop-up window will appear asking for confirmation. Click on “Add extension” to proceed with the installation.
- Once the installation is complete, you will see the Tron Link icon in your browser’s toolbar.
- Click on the Tron Link icon to open the wallet.
- Follow the on-screen instructions to create a new wallet or import an existing one.
- After setting up your wallet, you can start using Tron Link to manage your TRON assets, interact with DApps, and participate in TRON’s ecosystem.
Remember to backup your wallet’s private key or seed phrase and keep it in a safe place. This will ensure that you can always restore your wallet and access your funds, even if you lose access to your computer or the Tron Link extension.
By installing Tron Link, you gain access to a wide range of decentralized applications and services built on the TRON blockchain. It allows you to participate in various activities like trading, staking, lending, and gaming in a secure and convenient manner.
Installing Tron Link is a crucial step to fully utilize the potential of TRON and explore the decentralized web.
Step 1: Download Tron Link from the Official Website
Before you can set up Tron Link, you need to download the software from the official website. Tron Link is available for download on both Windows and Mac operating systems.
- Open your preferred internet browser and go to the official Tron Link website.
- Click on the “Download” button to start the download process.
- Choose the version of Tron Link that is compatible with your operating system. If you are using Windows, click on the “Windows” option. If you are using Mac, click on the “Mac” option.
- Once the Tron Link software has finished downloading, locate the installation file in your computer’s downloads folder.
- Double-click on the installation file to begin the installation process.
- Follow the on-screen instructions to complete the installation of Tron Link.
- Once the installation is complete, you can proceed to the next step to set up your Tron Link wallet.
By following these steps, you will be able to download Tron Link from the official website and prepare it for the setup process.
Step 2: Install Tron Link and Create an Account
Once you have installed the Google Chrome browser, the next step is to install the Tron Link extension. Here’s how to do it:
1. Open the Google Chrome Web Store
Go to the Google Chrome Web Store by typing “chrome://apps/” in the address bar of your browser. Alternatively, you can simply search for “Google Chrome Web Store” in your search engine.
2. Search for Tron Link
In the search bar of the Google Chrome Web Store, type “Tron Link” and press Enter. The Tron Link extension profile will appear in the search results.
3. Add Tron Link to Chrome
Click on the Tron Link extension profile in the search results to open its details page. Click on the “Add to Chrome” button to start the installation process.
4. Confirm the Installation
A confirmation dialog will appear, asking if you want to add Tron Link to Chrome. Click on the “Add extension” button to confirm the installation.
5. Create a Tron Link Account

After the installation is complete, the Tron Link icon will appear in the top-right corner of your browser. Click on the icon to open the Tron Link extension.
Click on the “Create Account” button to create a new Tron Link account. Follow the prompts to set up your account, including creating a password and saving your recovery phrase.
Note: It is important to save your recovery phrase in a secure location, as it will be required to restore your account if you ever lose access to your Tron Link wallet.
Congratulations! You have successfully installed Tron Link and created your Tron Link account. In the next step, we will explore how to import an existing TRON wallet into Tron Link.
Step 3: Set Up Tron Link in Your Browser
Tron Link is a secure wallet extension that allows you to interact with decentralized applications (dApps) on the Tron blockchain. Setting up Tron Link in your browser is essential if you want to access and use Tron-based dApps. Follow the steps below to install and set up Tron Link:
1. Install the Tron Link Extension

The first step is to install the Tron Link extension in your preferred browser. Tron Link is available for Chrome, Firefox, Brave, and Opera. Go to the official Tron Link website or your browser’s extension marketplace and search for “Tron Link”. Click on the “Add to [Browser Name]” button and follow the installation instructions.
2. Create a New Wallet
After installing Tron Link, a Tron Link icon will appear in your browser’s toolbar. Click on the icon and select “Create Wallet”. Choose a secure password for your wallet and set a distinct name. Write down your mnemonic phrase or save it in a safe place. This phrase will be crucial for wallet recovery, so make sure to keep it private and secure.
3. Import an Existing Wallet (Optional)
If you already have a Tron wallet, you can import it into Tron Link by clicking on the Tron Link icon and selecting “Import Wallet”. Enter your wallet’s private key or mnemonic phrase to import and access it through Tron Link. Make sure to only import wallets that you trust and that are not compromised.
4. Connect Tron Link to a dApp
Now that you have set up Tron Link in your browser, you can start using it to interact with Tron-based dApps. When visiting a Tron dApp, look for a “Connect Wallet” or similar button. Click on it, and Tron Link will automatically detect the dApp and ask for your permission to connect. Confirm the connection, and you will be able to access the dApp’s features and functionalities using Tron Link as your wallet.
That’s it! You have successfully set up Tron Link in your browser. You can now explore and enjoy the wide range of dApps available on the Tron blockchain.
| Note: | Make sure to keep your Tron Link password, mnemonic phrase, and private keys secure. Avoid sharing them with anyone and beware of phishing attempts. |
Step 4: Secure Your Tron Link Account
Securing your Tron Link account is crucial to protect your funds and personal information. Follow these steps to ensure the security of your Tron Link account:
- Create a Strong Password: Choose a unique and strong password for your Tron Link account. Avoid using common words or easily guessable information. Include a combination of uppercase and lowercase letters, numbers, and special characters.
- Enable Two-Factor Authentication (2FA): Activate 2FA for an extra layer of security. This feature requires you to provide a second form of verification, such as a code from a mobile app, in addition to your password when logging in to your Tron Link account.
- Be Wary of Phishing Attempts: Be cautious of phishing scams that aim to trick you into revealing your account details or private keys. Always double-check the website’s URL and make sure it is the official Tron Link website. Avoid clicking on suspicious links or giving out sensitive information.
- Regularly Update Tron Link: Keep your Tron Link wallet up to date with the latest version. Developers often release updates that include security patches and enhancements, so regularly check for updates and install them promptly.
- Backup Your Wallet: Create a backup of your Tron Link wallet and store it in a secure location. This ensures that even if you lose access to your device, you can still regain access to your funds using the backup. Follow the instructions provided by Tron Link to back up your wallet.
- Use a Secure Network: Avoid using public or unsecured Wi-Fi networks when accessing your Tron Link account. Use a trusted and secure internet connection to minimize the risk of unauthorized access to your account.
By following these steps, you can significantly increase the security of your Tron Link account and protect your investments and personal information from potential threats.
What is Tron Link?
Tron Link is a browser extension wallet that allows users to interact with the Tron blockchain. It is a secure and convenient way to manage digital assets and access decentralized applications (DApps) on the Tron network.
How can I download and install Tron Link?
To download and install Tron Link, you need to go to the Tron Link website or search for it in your browser’s extension store. Once you find the Tron Link extension, click on the “Add to Chrome” or “Add to Firefox” button, and it will be downloaded and installed automatically.
Can I import an existing Tron wallet into Tron Link?
Yes, you can import an existing Tron wallet into Tron Link. To do so, click on the Tron Link icon in your browser’s toolbar, select “Import Account”, and enter your private key or mnemonic phrase. Your existing wallet will be imported into Tron Link, and you can access it from there.
Is Tron Link safe to use?
Yes, Tron Link is designed to be safe and secure. It uses industry-standard encryption and security measures to protect your digital assets and private information. However, it is always recommended to use additional security measures such as enabling two-factor authentication and keeping your device and browser up to date.